It's never easy to decide which Java version to require for your project: On the one hand you want to give users the freedom of choice, so it would be nice to support several major versions, not just the newest one. On the other hand you're dying to use the newest language features and APIs. From Java 9 on, multi-releas JARs give you an opportunity to reconcile these opposing forces - at least under some circumstances.
Multi-release JARs allow you to create a single JAR that contains bytecode for several Java versions. JVMs will then load the code that was included for their version.
▚Creating Multi-release JARs
Multi-release JARs (MR-JARs) are specially prepared JARs that contain bytecode for several major Java versions, where...
- Java 8 and older load version-unspecific class files
- Java 9 and newer load version-specific class files if they exist, otherwise falling back to version-unspecific ones
To create an MR-JAR, use the new jar option --release ${version}, followed by the common way to list class files (directly or with -C; check the documentation).
Use the jar option --release to create MR-JARs
▚Hello, Multi-release JARs
As an example, let's say you need to detect the currently running JVM's major version. Java 9 offers a nice API for that, so you no longer have to parse a system property. By deploying a multi-release JAR you can make use of that API if running on Java 9 or later.
The hypothetical app has two classes, Main and DetectVersion, and the goal is to have two variants of DetectVersion, one for Java 8 and earlier and another for Java 9 and later.
The former will parse the system property, whereas the latter will use the new API.
To more easily observe what exactly is going on, you can add a message like "I'm on Java 8/9" to the constructor.
These two variants of DetectVersion need to have the exact same fully-qualified name, which makes it challenging to work with them in your IDE.
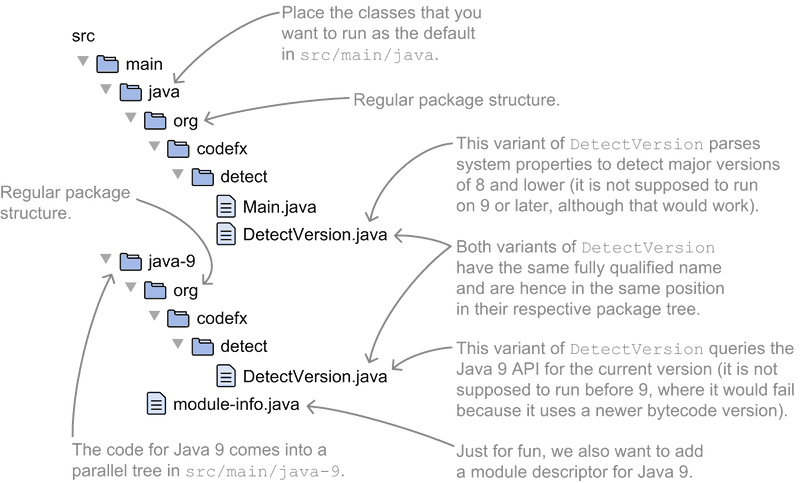
For ease of this introduction, let's say you organized them into two parallel source folders, src/main/java and src/main/java-9:
And here's how to compile and package them into an MR-JAR:
# compile code in `src/main/java` for Java 8 into `classes`
$ javac --release 8
	-d classes
	src/main/java/org/codefx/detect/*.java
# compile code in `src/main/java-9` for Java 9 into `classes-9`
$ javac --release 9
	-d classes-9
	src/main/java-9/module-info.java
	src/main/java-9/org/codefx/detect/DetectVersion.java
# when packaging the bytecode into a JAR, the first part (up to
# `-C classes .`) packages "default" bytecode from `classes` as
# usual; the new bit is the `--release 9` option, followed by
# more classes to include specifically for Java 9
$ jar --create
	--file target/detect.jar
	-C classes .
	--release 9
	-C classes-9 .
By running the resulting JAR on JVMs version 8 and 9, you can observe that, depending on the version, a different class is loaded.
▚Setup And Support
In that simple example you created two variants of DetectVersion, one for the minimally required Java 8 and another for Java 9.
Formalizing that to guarantee correctness of the general case of creating a feature with several classes for several versions is surprisingly complex and tedious, so I'll spare us the formal version - instead I'll give a simple rule of thumb later.
Build tools and IDEs don't really have good support for multi-release JARs, yet, but it's possible if you put in a little work:
▚Internal Workings Of Multi-release JARs
So how does a multi-release JAR work?
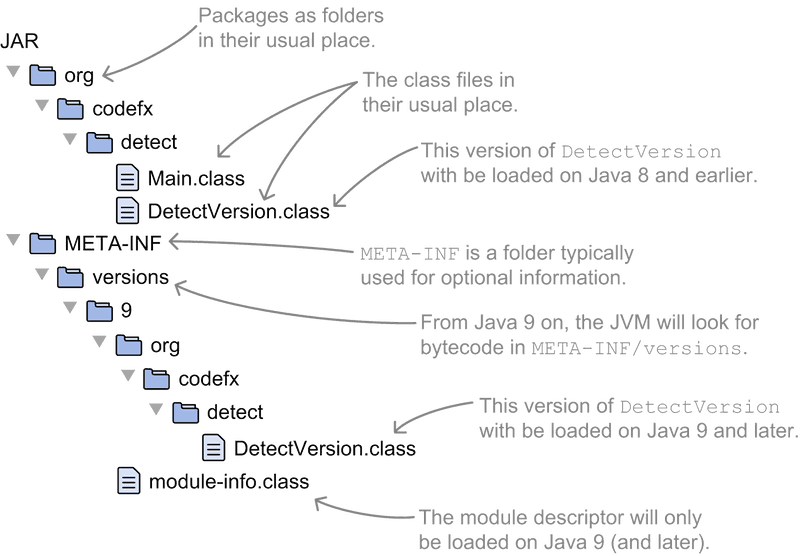
It's actually pretty straightforward: It stores version-unspecific class files in its root (as usual) and version-specific files in META-INF/versions/${version}.
JVMs of version 8 and earlier don't know anything about META-INF/versions and simply load the classes from the package structure in the JAR's root.
Consequentially, it is not possible to distinguish between different versions before 9.
It is not possible to distinguish versions before 9
Newer JVMs, however, first look into META-INF/versions and only if they don't find a class there, into the JAR's root.
They do that "searching backwards" from their own version, meaning a Java 10 JVM looks for code in META-INF/versions/10, then META-INF/versions/9, then the root directory.
These JVMs thus shadow version-unspecific class files with the newest version-specific ones they support.
▚Usage Recommendations
Now that you know how to create multi-release JARs and how they work, I want to give you some recommendations for how to make the most out of them. More precisely, I'll give you tips on these topics:
- how to organize source code
- how to organize bytecode
- when to use MR-JARs
▚Organizing The Source Code
I propose two guidelines when organizing source code for MR-JARs:
- The code for the oldest supported Java version goes into the project's default root directory, for example
src/main/javanotsrc/main/java-X - The code in that source folder is complete, meaning it can be compiled, tested and deployed as is, without additional files from version-specific source trees like
src/main/java-X
Sticking to these guidelines, you keep the source tree as simple as possible
(One addendum to the last point: If you're offering a feature that only works on a newer Java version and can't be steered around, having a class that throws errors stating "Operation not supported before Java X" in the "regular" source tree counts as complete - my recommendation is to not simply leave it out because that would make the project tough to compile.)
These are not technical requirements; nothing stops you from targeting Java 9 and putting half of the code into src/main/java and the other half, or even all of it, into src/main/java-9, but that only causes confusion.
By sticking to the guidelines, you keep the source tree's layout as simple as possible. Any human or tool looking into it sees a fully functioning project that targets the required JVM version. Version-dependent source trees then selectively enhance that code for newer versions.
How do you verify whether you got it right? As I said early, a formal description is complex, so here's that rule of thumb I promised: To determine whether your particular layout works, mentally (or actually)...
- compile and test the version-independent source tree on the oldest supported Java version
- for each additional source tree...
- move the version-dependent code into the version-independent tree, replacing files where they have the same fully-qualified name
- compile and test the tree on the newer version
If that works, you got it right.
▚Organizing The Bytecode
A straight path leads from that source tree structure to my proposal for organizing the bytecode in the actual JAR:
- The bytecode for the oldest supported Java version goes into the JAR's root, meaning it is not added after
--release - The bytecode in the JAR's root is complete, meaning it can be executed as is without additional files from
META-INF/versions
Once again, these are no technical requirements, but they guarantee that everybody looking into the JAR's root sees a fully functioning project compiled for the required JVM version with selective enhancements for newer JVMs in META-INF/versions.
▚When To Use Multi-release JARs
So how do MR-JARs help you solve the dilemma of picking the minimally required Java version? First of all, and to state the obvious, preparing a multi-release JAR adds quite a bit of complexity:
- Your IDE and build tool must be configured appropriately to allow easy work on the source files with the same fully-qualified name that are compiled against different Java versions
- You need to keep multiple variants of the same source file in sync, so that they keep the same public API
- Testing gets more complicated because you might end up writing tests that only run or pass on specific JVM versions
That means you should carefully consider using that feature. There should be a considerable pay-off to go down this road. (Maybe you can simply raise the required Java version after all?) The blog post on MR-JARs with Gradle that I linked earlier also discusses some downsides.
Then, MR-JARs are not a good fit for using convenient new language features. As you have seen, you need two variants of the involved source files and no argument for convenience stands to reason if you have to keep a source file with the inconvenient variant around. Language features will also quickly pervade a code base, leading to a lot of duplicate classes. This is not a good idea.
APIs, on the other hand, are the sweet spot. Java 9 introduced a number of new APIs that solve existing use cases with more resilience and/or performance:
APIs are the sweet spot for multi-release JARs
- detecting the JVM version with
Runtime.Versioninstead of parsing system properties - analyzing the call stack with the stack-walking API instead of creating a
Throwable - replacing reflection with variable handles
If you want to make use of a newer API on a newer Java release, all you need to do is encapsulate your direct calls to it in a dedicated wrapper class and then implement two variants of it - one using the old API, another using the new. If you've accepted the complexities outlined before, then this is straightforward.
▚Reflection
- Multi-release JARs can contain bytecode for different Java versions and JVMs from version 9 on can shadow version-unspecific classes with version-specific ones.
This allows you to use new APIs if the JAR is executed on a JVM that supports them. They don't really help if you want to use new language features.
- To create an MR-JAR, type out the
jarcommand as usual for the version-unspecific class files, followed by--release 9(for Java 9) and the Java-9-specific class files. - JVM versions before 9 will only load class files from the artifact's root directory.
Regardless of which baseline version you choose (even if it is 9 or later) these classes should be a fully-functioning version of your project.
- Version-specific class files end up in
META-INF/versionsand JVMs of version 9 and newer will first look there.
You should aim to keep the amount of code in here low to reduce complexity.
- Generally speaking, creating multi-release JARs complicates the entire development process from IDE and build tool configuration, to design, code, and tests.
Only use this feature if you get something in return.


